Your facebook target market as a local yoga business
If your business can get in front of the right Facebook target market, you’ll be golden.
This is tough to do though if you’re
- Boosting posts with no back-end strategy,
- Only trying to reach strangers, and
- Not leveraging the data available to you in Facebook.
But if you really want to
- Reach people that have PROVEN interest in your business,
- Get your posts seen again and again by ideal clients, and
- Generally feel way better about your marketing expenses,
You want to advertise to Facebook audiences that are most likely to become clients. In this post, I show you exactly what those audiences are.
(This post is Chapter 6 of Yoga Advertising On Facebook: The Ultimate Guide. See a full table of contents here, and for a PDF copy, click the button below.)
The BIG mistake most advertisers make with Facebook Target Markets
The #1 mistake people entrepreneurs make with Facebook ads is this:
They haven’t determined if their audience cares or not.
Now, I get it – you see an opportunity to boost a post and think to yourself “How can I NOT be doing that?”

Here’s the problem: you don’t know if those people even care.
If they don’t care, and you keep following them around the internet, they’re going to get annoyed.
That’s bad marketing, and the marketers taking that approach are giving us all a bad rap. You might as well do billboards if you only care about reaching the maximum number of people.
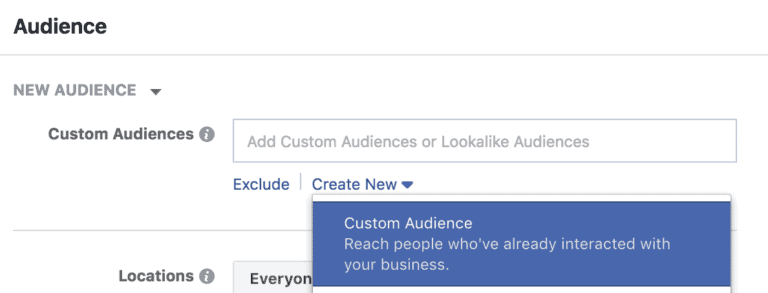
Instead, let’s focus on reaching people who have already heard of you or will probably like what you do – these are called custom audiences.
Why you should use a “custom audience”
Facebook’s technology lets us advertise to the people who have already shown interest based on where they’re browsed or how they’ve interacted with your content previously.
You can get in front of Facebook users who watched your videos or engaged with your posts.
You can get in front of your email newsletter subscribers or people who visited your website.
And as for newbies who have never heard of you, there’s a way to get in front of them too by using “Lookalike audiences” – groups of people who don’t know you, but behave similarly to your buyers or subscribers.
Five Types of Custom Audiences Good for Local Businesses
The five custom audiences in Facebook we’ll discuss here are:
- Users who watched your videos
- Users who are on your email list
- Users who commented or shared on your posts
- Users who visited your website
- Lookalike audiences (Users who look like one of your previously selected audiences)
Let’s go through each in detail.
<video goes here>
Custom Audience #1: Video Viewers
Anyone who watches a video of yours for three seconds or more gets captured into an audience. You can then advertise upcoming launches, promotions, or sales only to these audiences, because they showed interest.
You can also filter out users who watched for 10 seconds or more, or who watched 25%, 50%, 75%, or 95% of a video.
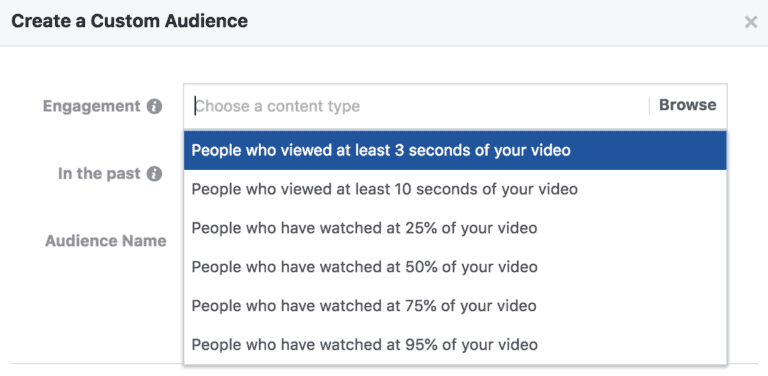
The longer the watch time, the smaller the audience – but it also means that audience is more engaged.
To create a video views audience, go to “Custom Audiences”. Then go to “Engagement.”
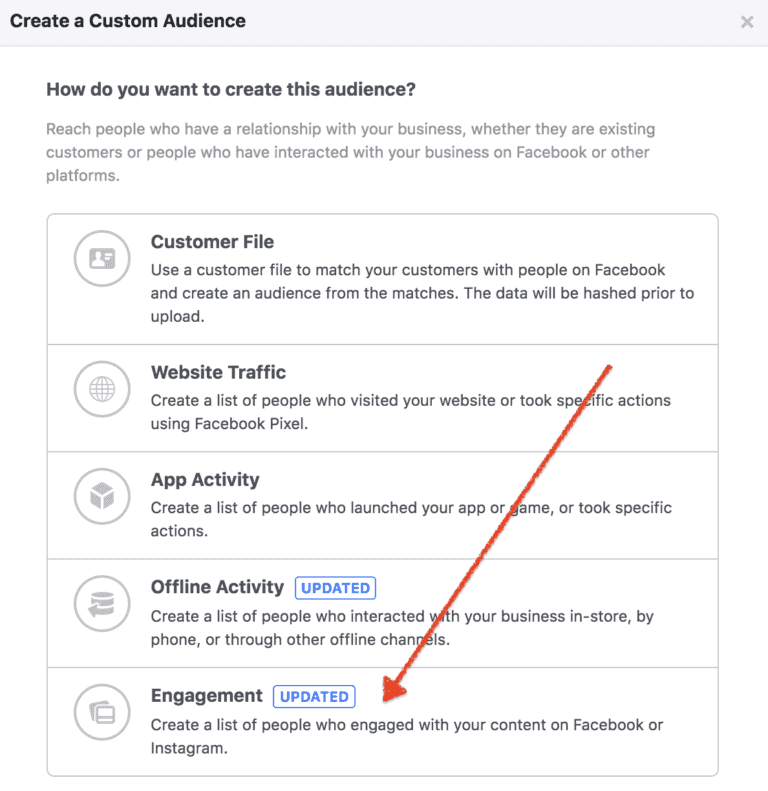
Then, go to “Video”.
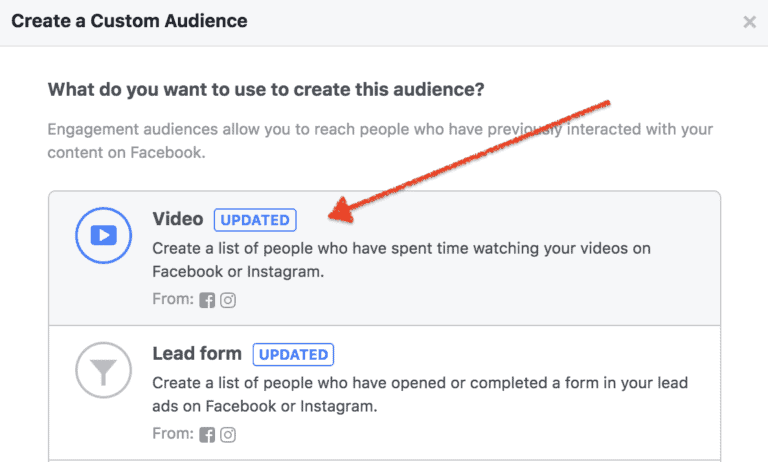
Select your video length, then choose which videos you want to pull your video views from.

Then, name your audience and click “Create Audience”.
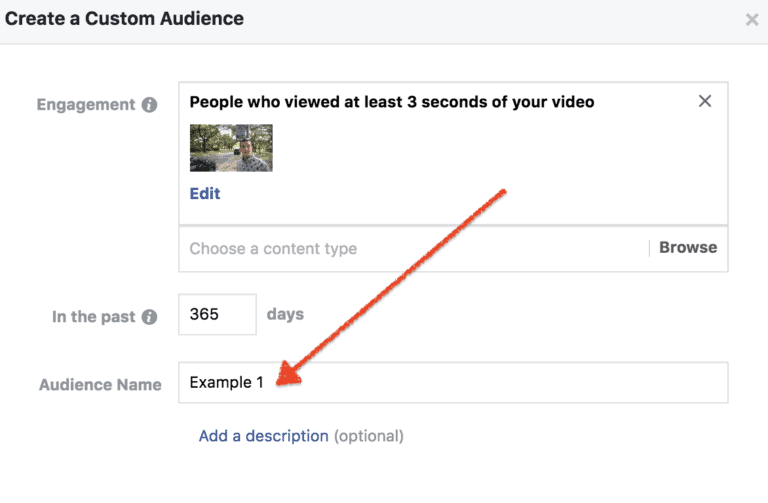
From there, you’re all set!
The great thing about a video views audience is that it will automatically update. If new people watch this video down the line, they’ll be automatically added to this audience.
Custom Audience #2: Email Subscribers
Email open rates are abysmal these dates – in the 10-30% range for most businesses.
So if you have an important announcement to make, you need something else besides email to reach a larger percentage of these people – otherwise 3 out of 4 of your members aren’t getting updates.
You can advertise to your email subscribers on Facebook by uploading your email list. (These need to be people who opted in to your list, though – no borrowed or bought lists.)
I suggest you upload your email list to Facebook, and use a Facebook ad to amplify your existing email marketing strategy.
You heard that right – you can upload an email list to Facebook, and then run sponsored posts that show JUST to the people that are on your list, keeping it relevant.
You’ll get way better bang for your buck when you do this.
Notice I use the word “amplify”. I often find people try to use Facebook ads to replace their marketing strategy, rather than amplify it.
We’re just using a Facebook ad to up the percentage of your list that sees your message.
First, you want to export your existing email list into a CSV file (CSV stands for “comma separated values”).
I also want you to grab the web link of your email newsletter.
This is a link that people click on and it will open your newsletter as a web page.
I use ActiveCampaign, personally. You can find the link by going to the campaign itself and clicking on the title of the campaign:

Then, go to “Message” on the left. From here. Grab the link from the left-most button on the “sharing links” header:

I suggest you post your update (with email newsletter link) on your Facebook page first, THEN run your post as an ad. (You can schedule posts on a Facebook business page.)
Once you have your CSV file and your newsletter link, go into your “Ads Manager” page in Facebook Business Manager.

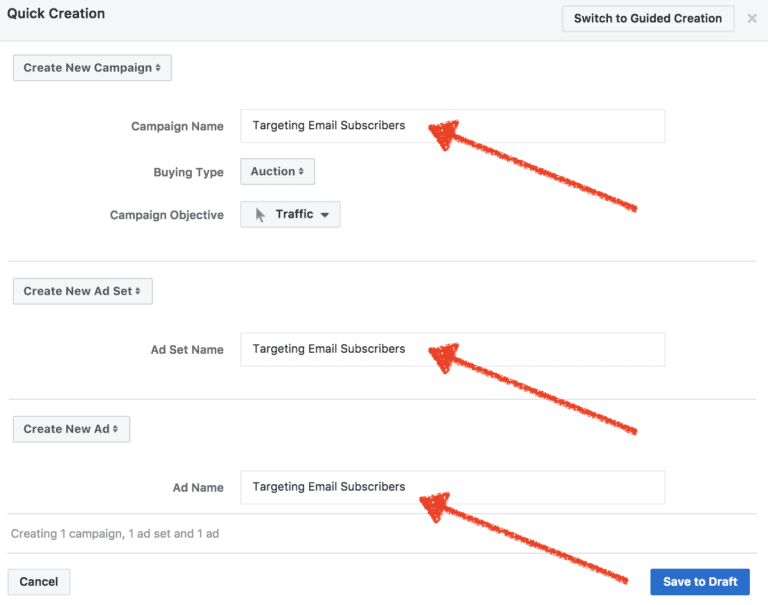
First, go to Campaigns, then click the green “create” button.
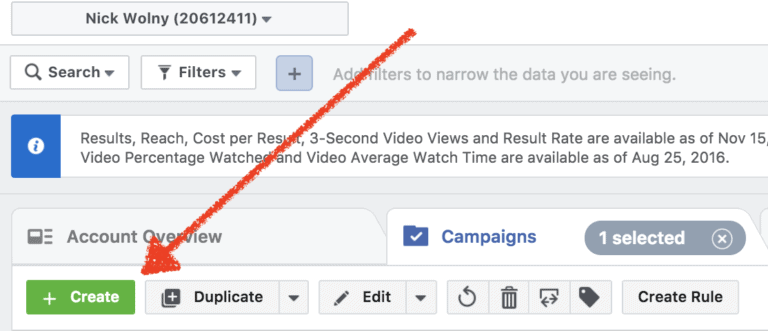
You’ll create a campaign, ad set, and ad. I just use the same name for all three for the purposes of this campaign.
Once your campaign is made, you’ll click on the “Ad Sets” tab. Your ad set should already be selected. Click the Pencil button on the right side of the screen to expand the editor.

Scroll past budget – you can set that later based on how many people you want to reach and in what timeframe.
Instead, go to “Audiences”.
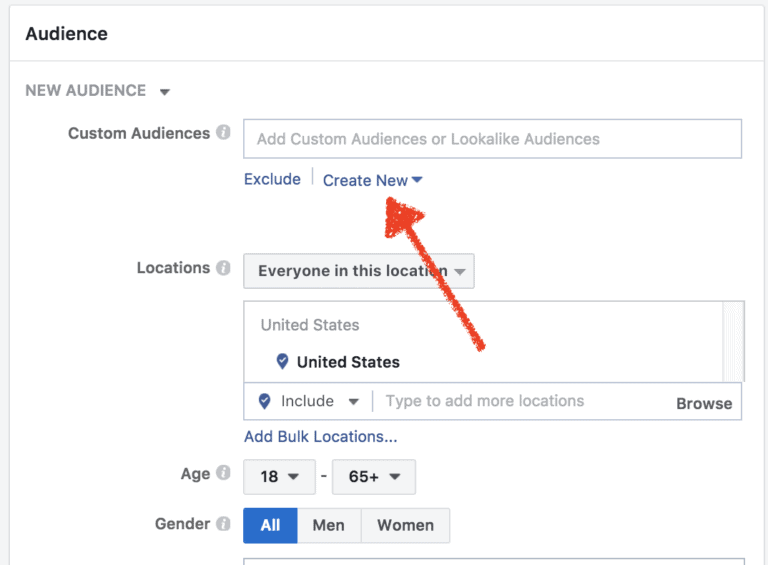
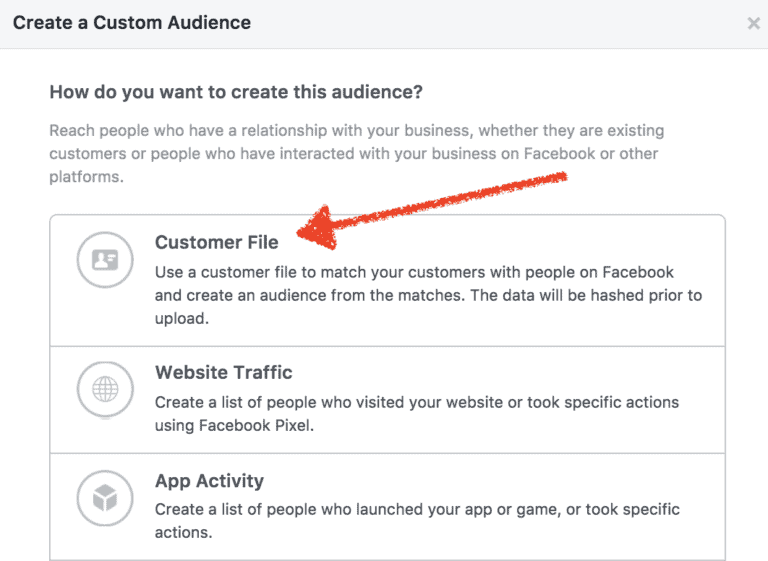
Click “Create New”, then “Custom Audience”. You’ll be here. Click “Customer File”.
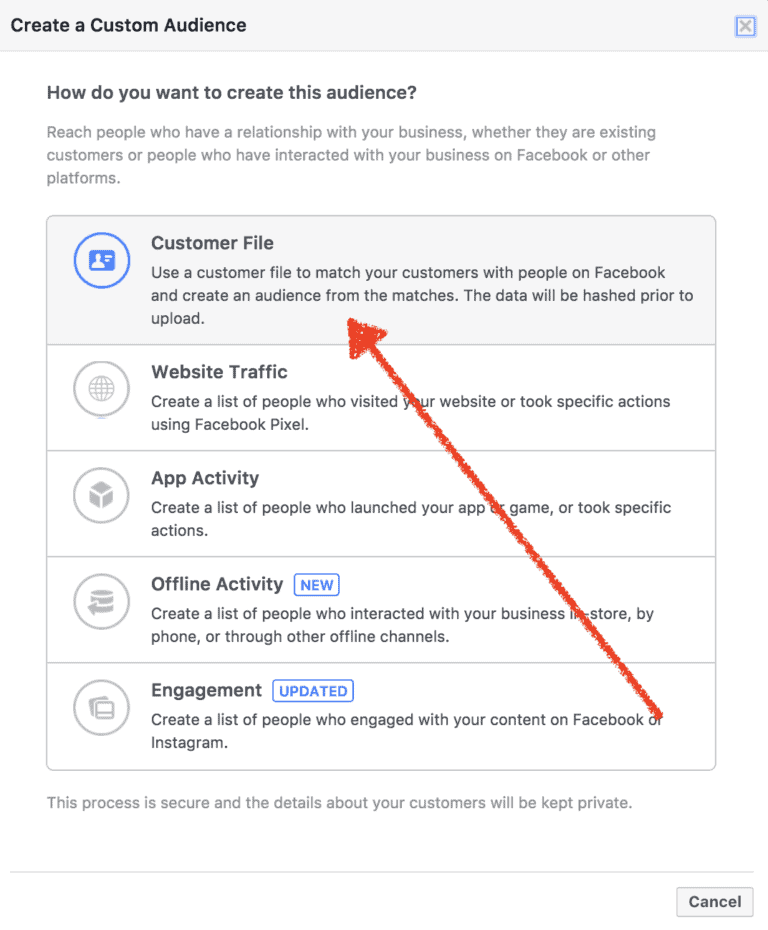
Now we’re going to upload your CSV list directly into Facebook.
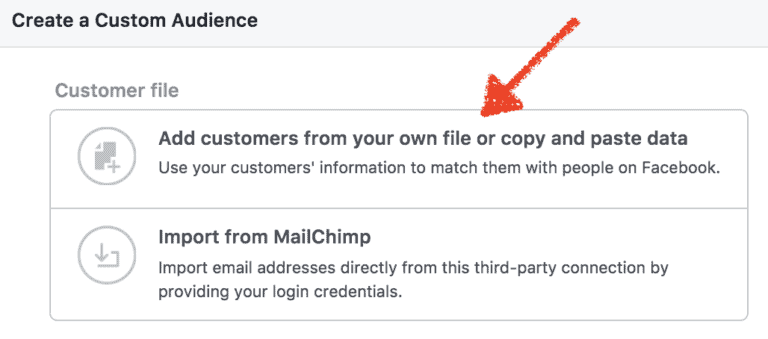
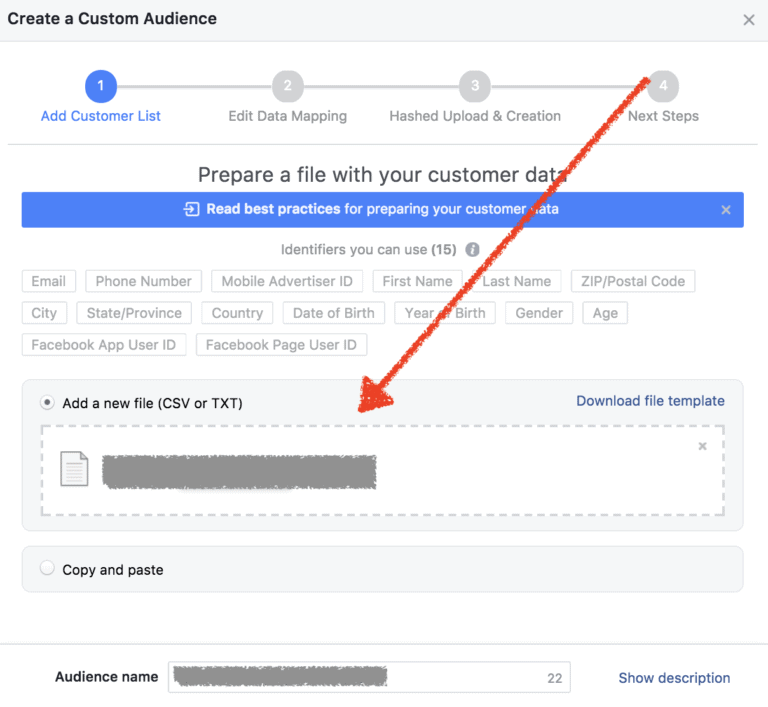
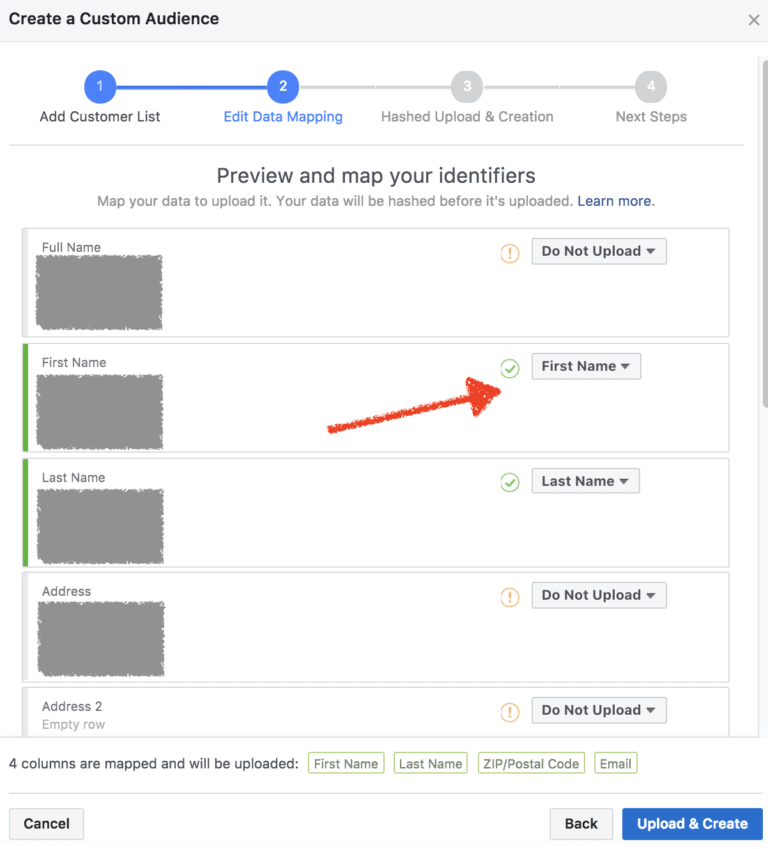
Once you’ve uploaded the file, Facebook will ask to map some of the data. When appropriate, assign each column to a data point that Facebook can look for.
Some of these will be already assigned, like “Email”, when it’s really obvious to Facebook what the data point is.
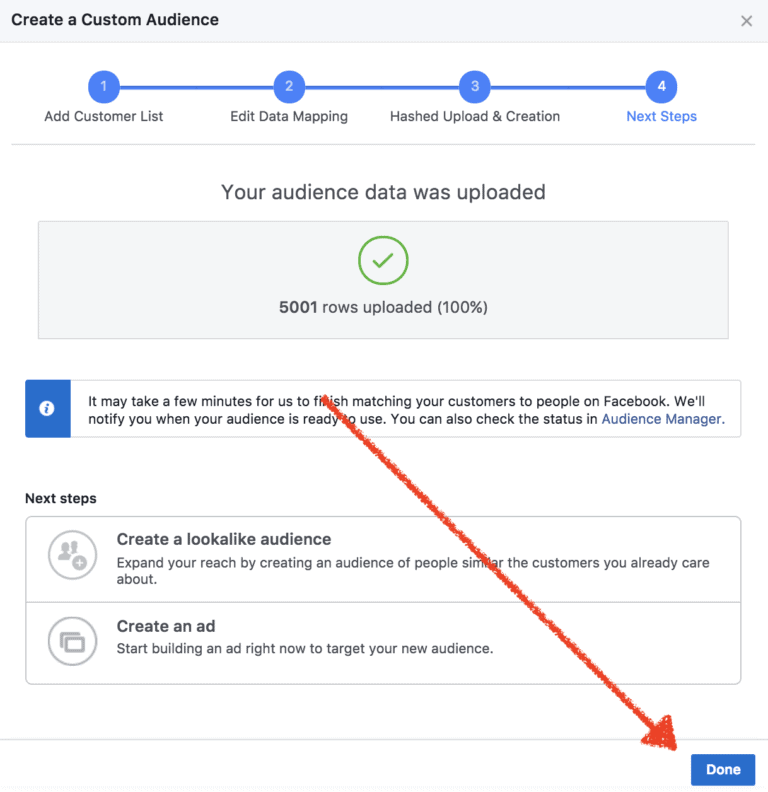
About 50-80% of your email list will cross over. It depends on whether Facebook can link your subscribers’ information to their user account.
The more data you can map, the better the matching.
Now you save as a custom audience! This takes Facebook about 30 minutes to complete fully, but you can set up your ad in the meantime.
Custom Audience #3: Post Engagements
For most businesses, this audience is pretty small.
But it’s good to know that you can get back in front of users who engage with your posts. Whenever possible, create posts that encourage engagement!
First, go to custom audiences, and select “Engagement”.
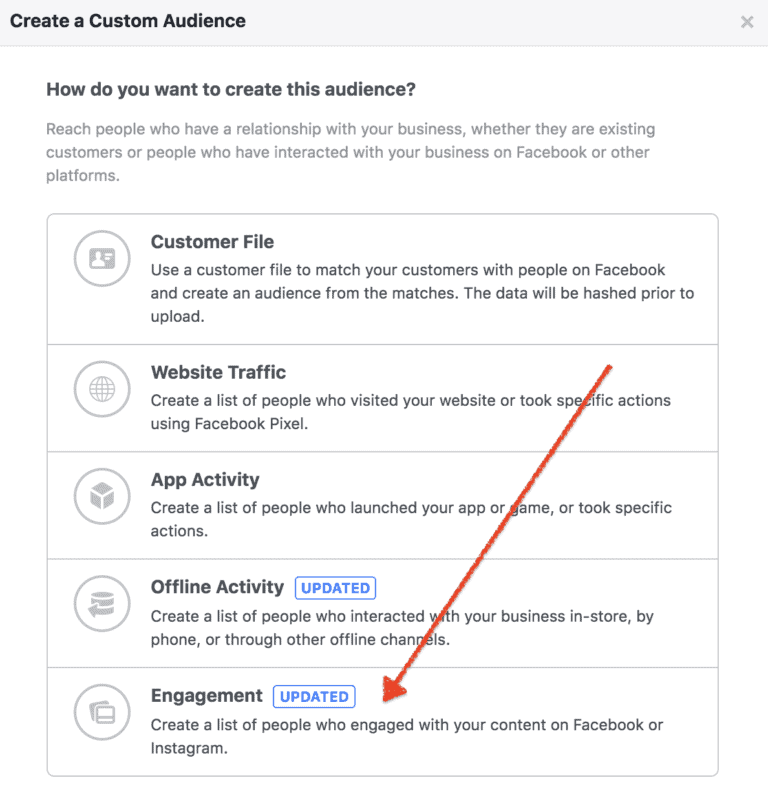
You’ll now pick “Facebook Page” as your source.
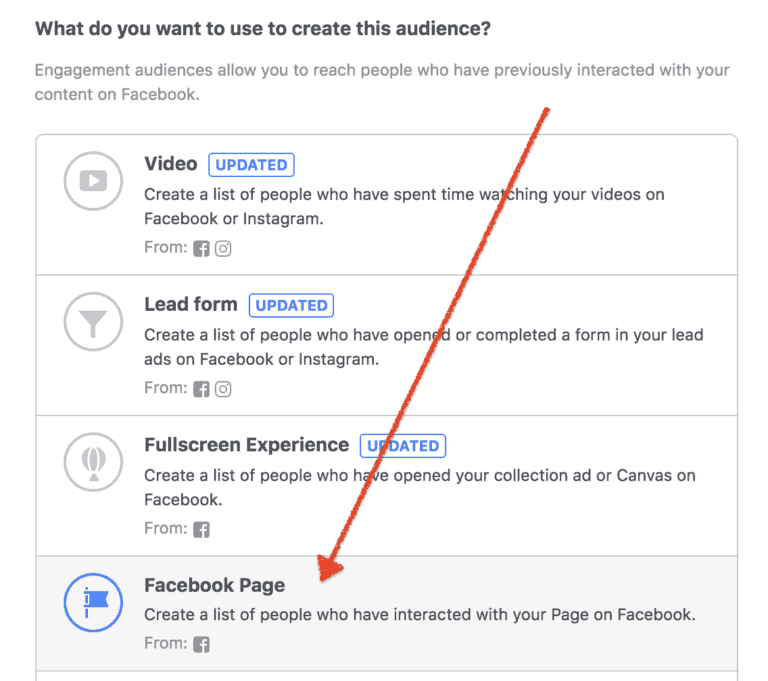
From here, you can choose a number of options based on how people interact with your page.
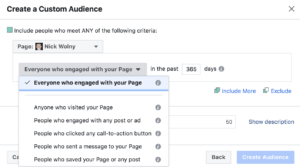
Again, this option is usually better for larger businesses, or businesses who have posts that have driven a LOT of comments or page visits.
Custom Audience #4: Website Visitors
When the Facebook pixel is on your website, you can use it to track users who visit a web page – and then get back in front of them.
(A setup guide for Facebook pixel is in Chapter 4a if you need it – it’s here.)
For yoga businesses, this is an awesome tool. For example, you can follow up on visitors who visited your “workshops” or “teacher training” pages with an ad that expands on the next upcoming workshop or teacher training.
This lets you get much more targeted with your ads and advertising efforts – and allows you to get announcements out to people who aren’t page followers or on your list when you have a promotion or sale.
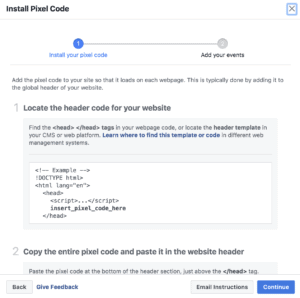
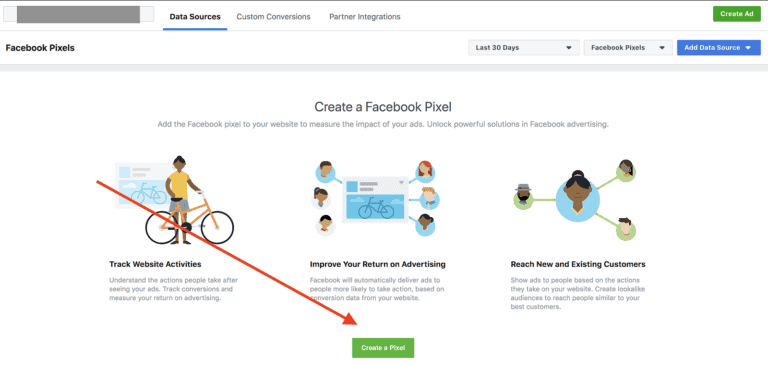
First, let’s create your pixel. In your Business Manager menu, navigate to “Pixels”.

You’ll be prompted to create a pixel – click the green button to get started.
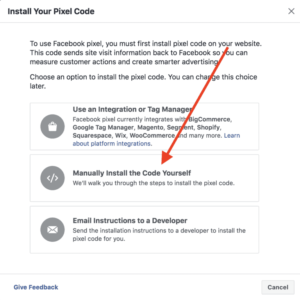
Integrations can get weird, so we’re going to manually install the code instead – choose Step 2 on this screen:
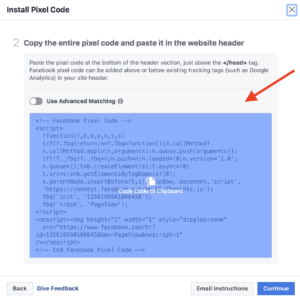
Now, in the following menu, scroll past step 1 and go to step 2. This is your Facebook pixel. When you hover over this code, a box appears prompting you to click to copy the code.
Now your code is copied! One more thing to do in this screen – Facebook suggests you download an extension called “Facebook Pixel Helper”. Download this bad boy!

This extension will help confirm that you’ve installed your pixel correctly.
Now let’s paste your copied pixel code into your website.
I’ll show you the two places I install pixels: WordPress and LeadPages. (If you have a different website provider like Squarespace, Clickfunnels, Shopify, et cetera, just google “How to install pixel for ___________.” There are loads of tutorials.)
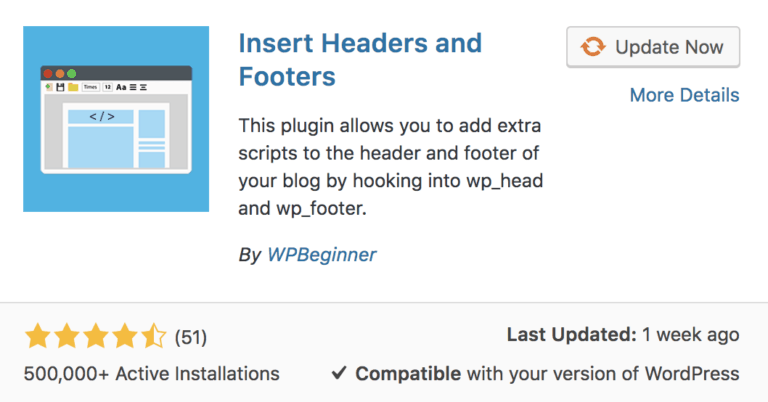
In WordPress, the fastest way to install a Facebook pixel is to download the “Insert Headers and Footers” Plugin.
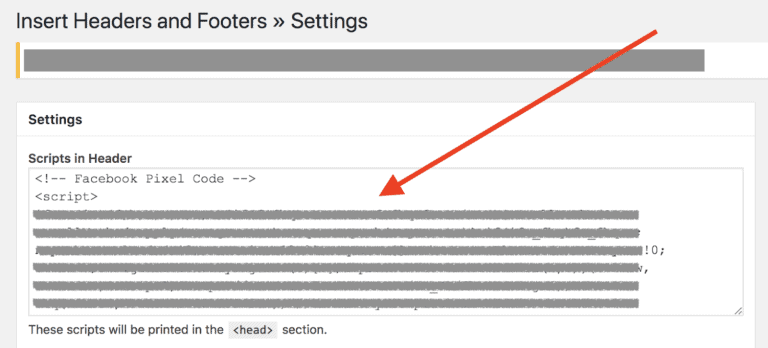
Then, in the plugin, paste your pixel code into your header.
If you’re using a landing page provider, I recommend Leadpages. It lets me create new opt-in pages and sales pages lickety-split.
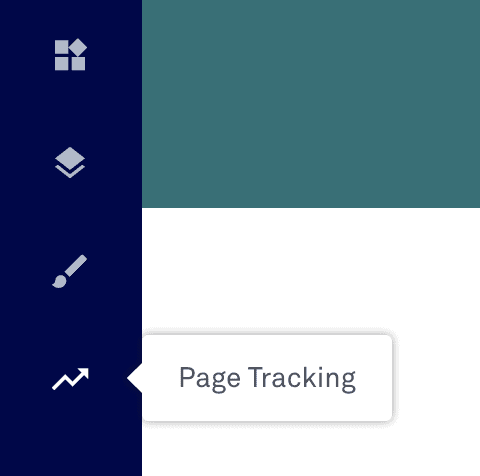
In Leadpages, navigate to the “Page Tracking” section on your left sidebar menu.
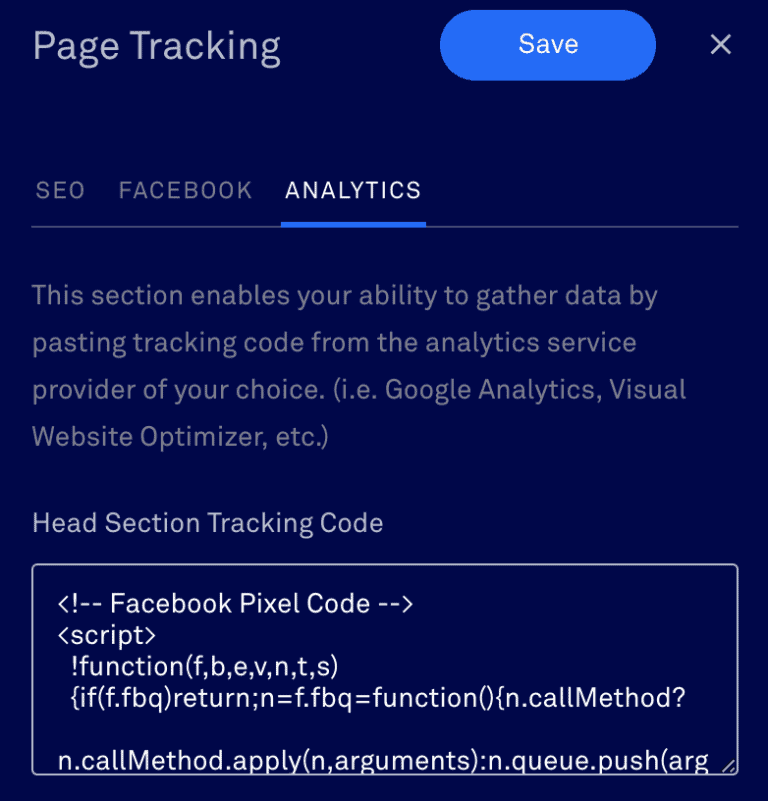
Then, choose “Analytics” and paste your pixel code into the page tracking section. Voila!
Custom Audience #5: Lookalike Audiences
First things first: A lookalike audience is an audience of strangers.
Unlike the previous audiences, these people have not seen your business before.
You’re able to target the 1% – 10% of people in your community whose data and browsing activity is most similar to your regular audience.
If your business wants to reach new people with Facebook ads, I strongly recommend you use a lookalike audience, because these people are “one lily pad away” from users who already know, like, and trust you.
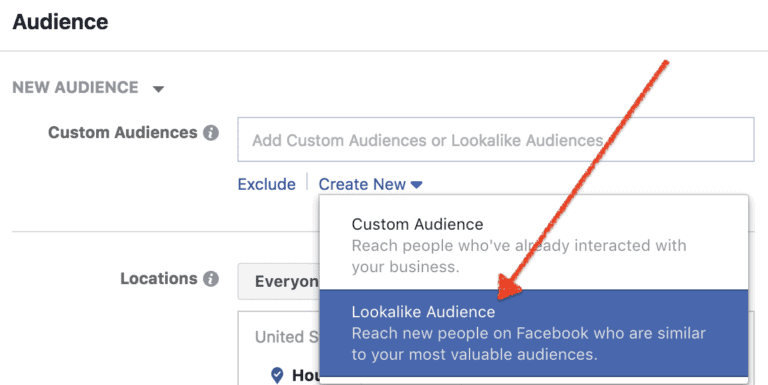
To create a lookalike audience, first go to “Audiences,” and create a new custom audience – except this time, choose lookalike audience.
Choose the audience you want the lookalike to look like. In this example, I just picked my business page, which is my name. You could also pick any custom audience you’ve previously created, though.
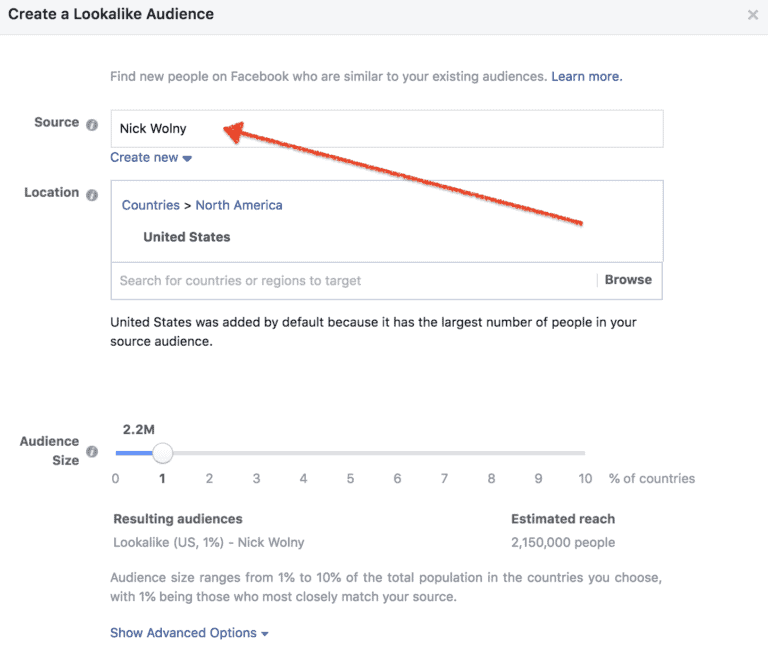
Then, choose the amount of lookalike, from 1% to 10% of the country or region you’re targeting.
I usually do 1-2% since I am targeting people nationwide; for a local business, you may need to go to 5% lookalike or higher for your audience to be big enough.

From there, your lookalike audience is all set!
Other audience tips for local businesses
Now, since we are a local business, you probably want to add some location parameters to your custom audience.
To do that, you just apply the usual demographic specifications to your custom audience. You can limit by location, for example, buy targeting a certain radius or zip codes.
You can specify age and gender in this section if you want to test the difference between those.
The best way to test different audiences
If you want to test different audiences and see which one performs the best, you need to give each audience its own ad set.
I set this up by duplicating the ad set and putting the audience specifications in the name of the ad set, so it’s easier to keep everything straight.
In the example below, we were testing a campaign at $16/day. Rather than put all $16 into one ad set with one audience though, we tested eight different audiences simultaneously at $2/day apiece.
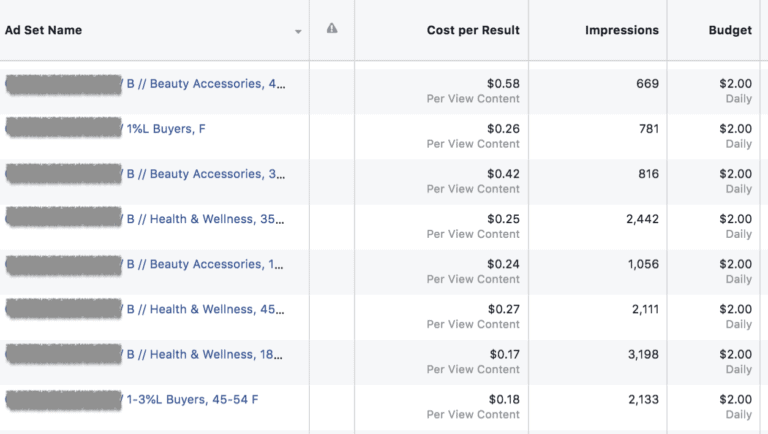
It becomes clear very quickly which audiences show more interest than others, which will help you more effectively manage your overall budget.
Audiences aren’t all that matter, though – you want to make sure your ad is showing in the right places.
You don’t want to do all this work and then flush your efforts down the drain.
We tackle placements in the next chapter of this guide – read it here.

